Home » DIY project » Page 3

Category: DIY project

DIY Spray-Painted Christmas Pinecones

This year, while getting into Christmas spirit mode, I decided that instead of making paper chain links with my son, we would make something that was a little more “grown up” and suitably matched to the rest of our holiday decor. Not that there’s anything wrong with paper links; we just wanted something a little different but equally budget-friendly. Thus, the spray-pained pinecone project was born.

First, we grabbed a bottle of gold spray paint at the hardware store.

Scavenging for pinecones was another story in itself. It was not as easy as it seems, unless you know for sure where a pinecone tree is in your neighborhood or if you can easily identify that type of tree like a true naturalist. I couldn’t do either. Peanut and I went to one park that was a complete bust. We found one lone pine tree in the acres that we scoured, and that tree didn’t yield pinecones.

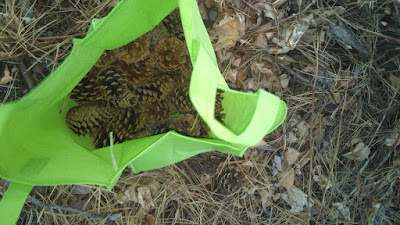
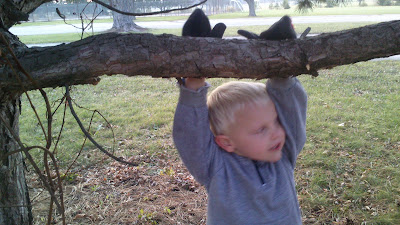
I decided to try one last spot just before giving up. We drove through our county park, and just as we turned a bend, I spotted a litter of pinecones below a small stand of pine trees. Peanut got excited about the find, especially since there was a playground behind the trees.

We gathered a whole tote-load. I tried to grab pinecones that looked pretty similar instead of a hodge podge.

Feel free to run after the geese and play on the trees and other natural fixtures while you’re there. It just makes it that much more fun.

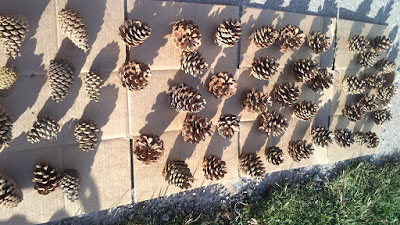
Once at home, we laid the pinecones out on cardboard. While Peanut was busy playing, I gave each pinecone several layers on gold paint (it’s an adult job after all). He came back intermittently to check on the progress and give me a few encouraging “these are beautifuls.” The effect of gold spray paint on pinecones is indeed beautiful.

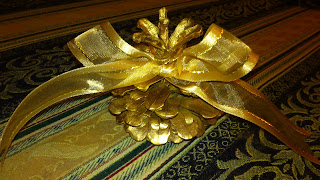
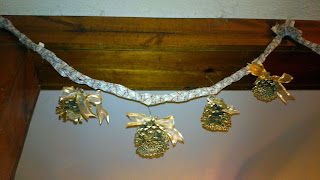
After the paint dried, I tied each pinecone with some matching gold ribbon that was left over from my wedding pew decorations (7 years ago!!!). Then, I let the decorating instinct kick in.

Some pinecones ended up on a cake stand that now holds our Nativity scene.

Some pinecones were strung through Christmas-y string to create a beautiful garland. Some were hung from a braided garland I made last year, giving it a refreshing new purpose and look.

It’s fun to take some simple spray-painted pinecones and turn them into a house-full of coordinating decorations.

What are your ideas for spray-painted pinecones?

The Birds Need A Christmas Tree Too!

One of our advent activities this month was to decorate a tree outside for the birds squirrels. After we found, cut down, and decorated our family indoor tree, we thought it would be fun to make one for our neighborhood critters too.

I had some pinecones leftover from a pinecone project I’ll be posting about soon. We decided to coat each pinecone in peanut butter and roll it through bird seed.

Pinecone bird feeder

Grandma also helped Peanut make a popcorn garland earlier in the day to up the festive factor. We hung the bird feeders and popcorn garland on a small, reachable tree in the backyard.

Pinecone Bird Seed

Later the next day, daddy watched a squirrel cut through the ribbon with his teeth and haul off a pinecone bigger than his head. That little bugger. I wish I had a picture! Watching how the pinecone treats were being consumed through the window made for a good laugh, a good story and a good feeling.

Photobucket

I hope to continue these decorating antics every year at Christmas. I’m pretty sure decorating an outdoor tree is going to become a family tradition we stick to as closely as we do our visit to the tree farm for our indoor tree. It’s so much fun! A simple way to bring a little extra brightness to these regular days as we continue counting down to Christmas. Plus, the whole experience made for some pretty special family time.

Any tips on how to feed a little more bird, a little less squirrel?

DIY Advent Calendar Ideas

I love the idea of Advent calendars because they present a way of bringing Christmas to the entire month of December. The anticipation that accompanies the countdown is unmatched–especially for a little boy at age 4. Typically, we mark X’s on calendars when we’re counting down the days to things like vacations and hunting season. For Christmas though, an Advent calendar does the counting for us, with plenty of fun and deliciousness built in.


Done a little differently, Advent calendars can also serve as an intentional way to make family time a priority. This year, we devised little activities or treats we could enjoy as a family. This way, every day in December produces the chance to make meaningful memories. Not only that, but we’re also generating new yearly family traditions (decorating a tree for the birds, picking out a new Christmas album, etc).


Our simple advent calendar was made with supplies from the Dollar Store or craft store. My Peanut and I simply went to town painting an $0.89 art canvas with acrylic paints I already had around the house.


Photobucket
Photobucket
Then, I cut 25 change rolls in half and arranged them in a Christmas tree shape.

 
Photobucket


We glued the rolls to the canvas and voila!


Photobucket


I printed a list of activities on a standard sheet of paper, cut them out, rolled them up, and put one in each roll. These are the activities we have been/are enjoying this December. Wouldn’t it be fantastic to make one of these for every month of the year just to make each day of the year a little extra special?

 
  • Downtown Art Walk: Morgan House, carriage rides (December 1, 6-9)
  • Enjoy a warm cup of apple cinnamon tea
  • Take a ride and look at Christmas lights
  • Rent Christmas music/books from the library
  • Go to the Dollar Store to pick up a new ornament
  • Play in the snow with hot chocolate after
  • Festival of Lights (December 4)
  • Take a walk around the neighborhood to look at Christmas décor
  • Put up lights/Santa stuff outside our house
  • Write a letter to Santa and send it
  • Visit Santa and tell him what you want for Christmas (Dec 8)
  • Decorate a Christmas tree outside for the birds
  • Make a new Christmas wreath together
  • Watch a Christmas movie together
  • Make/Decorate Christmas cookies
  • $1
  • $1
  • $1
  • Read the Christmas story in the Bible
  • Go buy a new Christmas CD/record
  • Donut Date
  • Find a special gift we can give to baby Jesus like the three kings did.
  • Camp out under the Christmas tree
  • Make hot chocolate (from scratch?)
  • Snowball fight!!!
 

Some of these activities had to be strategically placed on certain days when community events are happening. Due to the time involved and weekday constraints, some had to be relegated to the weekends (camp-outs, etc). As much as we love Santa, we tried to incorporate the real reason for the season as much as possible, such as renting Nativity books from the library and pointing out all the manger scenes among the decorated houses.


We have also been enjoying a piece of chocolate out of this good ol’ traditional Advent calendar.

 
Photobucket
How are you preparing for Christmas? Do you have any interesting Christmas traditions?

Boy Scout Log Painting DIY

I made these little log pictures as a gift for my son. His room has an outdoorsy theme, so I figured the boy scouts look would fit right in.

Photobucket

The designs are loosely based on the the merit badges from the official Boy Scouts site. I chose Forestry, Astronomy and Canoeing as the three themes that I would use when designing the pictures. I wanted the designs to be simple yet meaningful. We spend a lot of time in the out-of-doors, and these are three subjects that I can’t wait to explore more with my son. We’ve already watched the Perseid meteor shower together, hiked through many-a-forest and sailed across the water in our kayaks, so these insignias hold a special connection for us.

LogSupplies

Supplies

1. Three raw slabs of wood. I happened to find these fine specimens at the thrift store for $0.50, but you could easily make your own with a thick branch, saw, and sandpaper.
2. Acrylic paints
3. Paintbrush
4. Frame hangers

Directions

1. Sketch out your designs first. It’s easier to transfer a sketch to the wood when you finally find a look you like. It may take a few tries to get there.

Photobucket

2. Pencil the design on the wood and paint inside the lines as desired.

Photobucket

ThreeLogs

4. I used the same color scheme across all three pictures to keep the look color-coordinated and to make them match his room.

LogPalette

5. Meanwhile, if you have an extra paintbrush and painting surface, get your child involved too. Mine wanted to paint too, so I handed him my notebook and let him explore his abstract side.

Photobucket

6. Hammer the frame hangers into the back and hang as desired. If you’re hanging these in a sunny room, you might want to add a layer of finish over the top to help prevent the paint from fading.

I hope to do some more experiments with log slabs in the future. Maybe even use some leftover chalkboard paint that I have. We shall see. I really like having a few raw wood accents here and there in my home. They have a natural and raw aura about them without getting too woodsy and country for my taste.

Birthday Banner DIY #1: Fringe Benefits

At work, in my department, we skipped a year or two of celebrating birthdays. That made me sad. So, I took it upon myself to resurrect the whole birthday scene. I promised to make one tasteful, personalized banner for each birthday person. Nearly everything that I’ve made so far has been from supplies I already had on-hand (scrapbook paper, tissue paper, tree branches, etc), so it didn’t break my budget. I just think that birthdays are worth celebrating with something lovely.

Since I’ve been working my way through different designs for this past year, I thought it would be fun to share a few of them to perhaps inspire you for your next celebration.

I’ll begin with one of the simplest banners, cut from tissue paper.

Fringe Benefits Banner

1. Fold about 3-4 sheets of tissue paper in half. Then, fold in half again.

Photobucket
Photobucket

2. Cut along the folds on the side with open ends.

Photobucket

3. Using the side with the open ends, cut slits about halfway up every 1/2-inch to inch or so. They don’t need to be equal. This will give the banner a fringe-ish look.

Photobucket

4. Now, open the banner at the center and attach a length of string right down the middle with tape.

Photobucket

5. Flip back over and you’re finished. Use the ends of the string to attach your banner any way you wish. Use some coordinating scrapbook paper cut into 3″ x 3″ squares and some alphabet stickers to create the “Happy Birthday.” Staple the squares to a coordinating length of ribbon.

Photobucket

tissue paper banner

I used this same technique for the Concessions banner, except I cut a zig-zags along the end of the tissue paper before I cut the fringe. Feel free to play around with this design. These banners would be especially festive for a Hawaiian-themed party.

Photobucket

There’s more where that came from. I have some map banners, tassels and driftwood designs up my sleeve. Stay tuned!

*Hey, did anyone notice we got a new fence in the middle of this project? Hee hee!

DIY Mantra Workout Towels

The second mantra project I bring you is my signature hand-embroidered mantra workout towels. I love this idea, because your workout mantra is literally staring you in the face when you drape it over your treadmill or elliptical machine. The bright colors and cute crafty look are motivating in themselves…at least to me!

These mantras are not only cute, but they’re also pretty easy and very inexpensive. I got my microfiber towels from the Dollar Store and embroidery floss is usually less than a dollar at the craft store. See, if you’re resourceful, you can turn anything into something lovely.

Photobucket

Mantra Workout Towel

*Cotton or microfiber towel (mine’s from the Dollar Store)
*Contrasting embroidery floss
*Embroidery hoop (the thrift stores have tons of these for like 25 cents)
*Tapestry needle
*Chalk or fabric pencil

1. Secure your embroidery hoop around the spot you intend to embroider.

Photobucket

2. Draw your mantra or design out in chalk first. The chalk didn’t work great of the microfiber material I was using, so you might try a fabric pencil. I would also suggest using cursive writing, as it’s easier to connect all the lines when stitching.

3. Backstitch along your penciled-in lines all the way to the end.

Photobucket

4. Voila! You have your own handstitched, meaningful workout towel. See, embroidery isn’t something just for old ladies, ya know!

Photobucket

Photobucket
Photobucket

I think a workout mantra that is in writing somehow is a much more potent motivator than a phrase you only keep in your head. You can’t forget those words when they’re smiling back at you from your machine. These colors make me so happy too. Enjoy!

DIY Bleach-Painted Mantra Shirt

As promised, I have a few Mantra projects up my sleeve that I’d like to share to bring your favorite mantra with you on your workouts. Having your goals and mantras in writing is powerful!

The first project is a bleaching painting project, adapted from this post at A Beautiful Mess.

I wanted to make a workout shirt that brought my favorite powerful words in front of me at the gym. Seeing the reflection in the mirrors provides an additional reminder to live my life with purpose. I, of course, used my personal tagline “Make it Happen.”

Bleach Painting

Supplies:
*A dark cotton shirt/garment you’d like to bleach
*A couple tablespoons of bleach in a disposable cup
*Q-tips
*A piece of cardboard
*Chalk

BleachProjectSupplies

*Please take the necessary precautions when working with bleach.

1. Place cardboard between the layers of your shirt so the bleach doesn’t bleed through.

Put cardboard between layers

2. Draw your words/design on the shirt in chalk first to get the placement correct.

Write your mantra in chalk

3. Dip Q-tips in bleach and follow along the chalk lines. Be careful that your Q-tips don’t drip on the T-shirt while you’re working. I worked outside right in the sun, which made the lines show up immediately, and really bright! Be careful though, because the bleach can eat right through the fabric if you let it sit too long or put too much on.

Follow chalk lines with Q-tip dipped in bleach

4. Once the design starts showing through, you can go back and fix any parts that need a fixin’.

5. You may need to handwash the shirt several times until the bleach is all washed out before putting it in your regular laundry.

Sun-bleached

That’s it! Such a cool, simple way to make any ordinary shirt your own. It’s an especially cool way to keep your workout mantra front and center.

*Participating in the following:
Skip To My Lou

One Skein of Ribbon Three Ways

I love it when I visit the thrift store and snag pretty vintage ribbons. They don’t show up very frequently, but when they do… I swipe ’em.

Ribbon Skeins2, Thrift Store Ribbons

Not only are they pretty to look at, but they’re also great for sooooo many projects. I have used them as notebook binding with a little Modge Podge. I have glued them onto art journal and scrapbook pages. And I have also used them for the projects shown below. Let’s take this $0.25 skein and see how far it can go, shall we?

Vintage ribbon, Thrift store ribbons

1. The first thing I made with this, my favorite skein from the stack above, is a hair accessory holder. Most of my pretty hair pins were stuck in a makeup bag that didn’t see the light of day. I even routinely forgot and neglected what was in there! This was just a quick solution that I whipped up. It hangs from an adorable vintage towel holder in our bathroom closet.

Photobucket

All I did was take a length of the ribbon and fold it in half. Then, I hand-sewed two loops to both ribbon ends. I hang it folded in half so that I can loop my headbands through too (notice the burnt edge flower hairband). The ribbon is stiff enough that I can just slide my hairpins right on. I made the blue hairband and the top bow-tie clip. The second and bottom bow-tie clips were from Dainty Daisies. The big flower clip was from a now-defunct local store.

2. Ribbon headband: Remember how I told you that you could find hairband packs at dollar stores? This gray one came from one such pack. The bow is made by taking a small length of ribbon and either gluing or sewing the ends together to create a circle. Then, pinch the centers together and wrap with a coordinated ribbon. Sew the bow to the hairband and voila!

Ribbon hairband, Hairband made from vintage ribbon

3. Shower Ring Statement Necklace: I found this idea on Promise Tangeman’s blog. I connected three shower rings, wrapped ribbon around them, and strung them through a silver chain. Hot glue works just fine for holding the ribbon in place.

Photobucket

Fun, huh? And there is plenty…I mean plenty…of ribbon leftover. Let’s see where else this can take me.

Do it Cheaper: Burnt Edge Flowers

Photobucket

You’ve already seen them all over the interwebs: burnt edge flowers. But, do you know how to make them even more inexpensively? If there’s anything I know how to do, it’s budget crafting!

First things first, you need some sort of polyester material (satin, chiffon, etc). You could go to Hobby Lobby and pay $8 per yard. Or you could go to your local thrift shop and pay pennies per yard. How, you ask? By buying a satin robe, of course! Or a wedding dress or a polyester shirt or…

Photobucket

Bright Idea: This would be a great way to pass your wedding dress along to your daughters. Cut it up and make it into hairpieces and corsages for the whole wedding party!

This was the lovely polyester specimen that I found at my local thrift store. The shimmery sapphire blue color was gorgeous and the robe cost $0.75 on 1/2-off day.

Photobucket

Another idea: ask for fabric scraps from people you know or from people on Freecycle. I acquired some white and blue satin fabric from someone on Freecycle that was moving. Score! So really, you could make burnt edge flowers for FREE!

Next, cut the fabric into about five concentric circles. Don’t get too fussy, because once you burn ’em, they’ll be uneven anyway. The first circle should be around 4-1/2-ish inches and the last about 1-1/2-ish inches.

Photobucket

Take each circle and burn the outside edges by exposing the edges to a candle flame. DO NOT put the fabric directly in the flame. Start a few inches away and move closer as you feel comfortable until the fabric starts melting and curling up a bit. Melt all the way around each circle. Please be careful with the smaller circles so that you don’t burn yourself. You could even use tweezers or tongs to try to avoid getting burned.

Put the circles inside each other to create your “flower.”

Photobucket

The way you decide to embellishing the flower is up to you. I sewed some pearlescent beads to the center of mine. I also attached peacock feather strands to one of the flowers. Buttons, charms, it’s up to you!

Photobucket

Then, you can either make your flower into a lapel pin, hair pin, headband, shoe clip or other adornment by simply using a glue gun or needle and thread. I sewed a set of three burnt-edge flowers directly onto a stretchy headband. If I were to do the project over, I would have sewed all three to a single strip of felt first and then attached them to the headband. The flowers kind of pull apart and form gaps otherwise.

Burnt edge flower hairband

Another cheap trick: you can buy packages of stretchy headbands at discount or dollar stores. Check there first! I got like 10 black headbands for $2.

Now my mind is working on what to make with all that beautiful lace trim…hmmm. Any ideas?

Photobucket
Participating in the following link parties:

DIY Key Peg Board Makeover

This hodge podge of keys really bothered me, especially once I started dreaming up ways to streamline the look a little bit.

Photobucket

I bought a handful of these key tags and used my brand new 1-1/4″ hole punch. The circles just happened to be exactly the right size for the key tags.

Photobucket
Photobucket

I removed all the ties that the key tags came with and replaced them with some hemp ties and matching beads. I glued the 1-1/4″ circles (with a standard hole punched out) to one side of the key tag and labeled the key on the other side. Hint: use “code names” for the keys so if any unsavory intruders happen upon the pegboard, they won’t know exactly which key is for the garage and which is for the Mercedes. You know, just in case…

Photobucket

Here’s the finished look. I could’ve made it look a little cuter, but I was going for a cohesive, understated look here. Because I’m sure my husband wouldn’t appreciate his motorcycle keys all decked out in frilly pink ribbons with embroidery.

Photobucket
By the way, hubster is the one who made the pegboard itself. You’ll have to ask him about those details. He got some quality scrap wood from work, drilled holes in it for the key hangers, and stained the board dark walnut. There was probably some sanding and varnishing in there somewhere too.