Home » DIY project

Category: DIY project

Kids’ Entrepreneur Series: Monarch Wing Necklaces

Monarch Wing Necklace DIY

Hey #flashers,

Welcome back to my Kids’ Entrepreneur Series where I’m sharing the ins and outs of nurturing little entrepreneurs. In the first installment, I showed you how we put together nature necklaces to sell at my work craft fair (which btw didn’t happen because Kayne and I both ended up with the rampant flu that day. Major bummer).

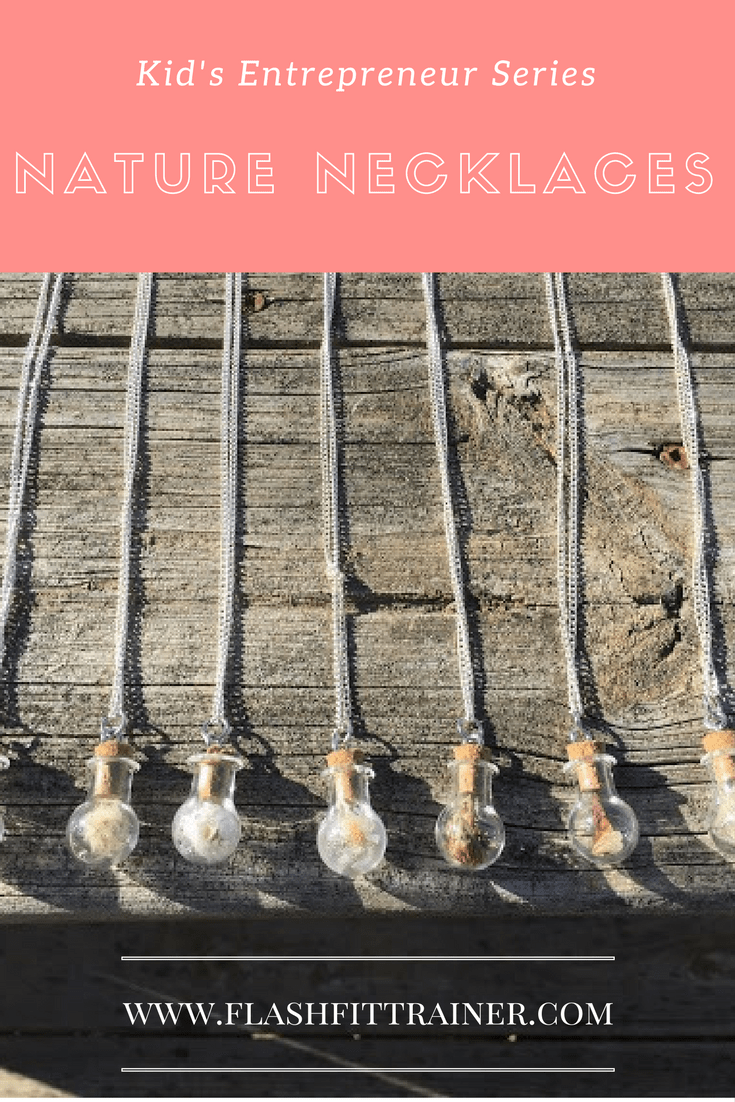
Today, I’m back with another batch of necklaces that my son helped me make that we intended to try to sell at the craft fair and will still try to sell to last-minute Christmas shoppers.

These are so incredibly magical to me, especially since we got to witness Monarch migration happening in our own backyard this year. We also visited the butterfly gardens where we got to tag and release a monarch. Then, we tried raising a few monarch caterpillars ourselves.

So, this summer had a bit of a monarch theme going for us (one year it was miniature golf).

And over the course of the summer, we were able to collect a whopping 20 wings! (remember, each butterfly has 4 viable wings) One butterfly was the accidental casualty of Hubsters truck that we found in his grill, RIP pretty butterfly. We found two after they passed away in our own backyard. And the rest were picked up at the butterfly garden when we visited.

Though these beautiful butterflies had run their course on this earth, we were able to preserve their earthly bodies where their beauty lives on.

IMG_1902.JPG

Press them in a thick book before using!


So, for the other supplies to do this project, we took a trip to Hobby Lobby and found these awesome glass window pendants. They came in a kit. Then, I bought one package each of matching jump rings, clasps, and cord crimps. I already had some nice black cord on hand. I used cord instead of silver to complement the black veins in the butterflies. The only other tool you need is a set of pliers.


IMG_1901.JPG

All you have to do is place the wing between the two glass windows and trim around the edges.


IMG_1903.JPG

Insert the glass panes into the silver frame and screw the top shut. They work just like embroidery hoops, if you know how embroidery hoops work.

IMG_1910.JPG


IMG_1905.JPG

Then, cut a piece of cord to your desired length. Attach the pendant to the cord with a jump ring.

Then, fold the ends down (because they fray) and squeeze a cord crimp on either end of the cord. Then attach a jump ring to connect the crimp to the clasp.

IMG_1906.JPG

IMG_1907.JPG

IMG_1908.JPG

IMG_1909.JPG


Voila! Quite simple actually! They probably seem more daunting than they  really are.

IMG_1925.JPG

And the finished product makes my heart leap!

IMG_1927.JPG

IMG_1928.JPG


Such a simple project to do with your kids where you end up with a beautiful piece of art that everyone falls in love with. These would make great Christmas presents too for any ladies left on your list.

For the gents, I suggest framing the wings in a masculine frame with a cool background. (If you want one and you’re local, hit me up; I still have some.)


Framed monarch butterfly wing

Since my nephews went to the butterfly house with us last year, I framed a wing for each of them instead of the necklace. They LOVED them! And oh, what a meaningful gift, since they’re so attached to a fun memory.


What types of projects have you done with your kids that were worth selling?

Kids’ Entrepreneur Series: Nature Necklaces

Nature necklace glass vials


My little buddy has the entrepreneur bug in him.

He’s always talking about what he can do or sell to earn money so he can accomplish his goals (i.e. buy toys, hehe).

And as my role as his momma and guide, I want to nurture the little business man in him.

So, we’ve been slowly working on projects so that he can earn some extra money.

Since we have a craft fair coming up at my workplace, we hustled our little buns off to get some inventory built up. A lot of people get their Christmas shopping done here. It’s perfect timing to get our little hustle on and get to selling!

So, what are we going to be selling at the craft fair?

Nature necklaces!

Now, we’ve done two batches of these necklaces. The first was with real monarch wings that we’ve been collecting over the course of the summer. I will come back in a few days to show you how we made them. The hardest part is finding the wings!

IMG_1928.JPG


The second is little glass vials and bulbs that we filled with little bits and pieces of nature. We took a walk around the yard and collected little tiny seeds and flowers and things that would fit inside these itsy bitsy little vials. We also had a set of bigger glass vials that we filled with treasures.

Btw, You can watch our Periscope about these necklaces here. (Subscribe to see this series unfold before your eyes).

IMG_2077.JPG

These fun mini vial kits are available at Hobby Lobby:

IMG_2076.JPG

All the pretty fall things to stick inside:

IMG_2080.JPG

Other ideas for what you could put inside the vials:

  • Calming or invigorating aromatherapy blends
  • Tiny scrolls with messages, poems or scripture
  • Sand/soil from places you’ve traveled: I brought back volcanic ash from Costa Rica in two of mine.
  • Charms with special meaning
  • A lock of hair from your child’s first haircut
  • Lace from your grandmother’s wedding dress
  • Bark from a tree at your childhood home


So, all we did was place the pretty nature bits inside and plug them with the included cork. Then we used jump rings to attach the eye hooks to the necklaces.

IMG_2082.JPG

IMG_2083.JPG

IMG_2085.JPG

Annnnnnd, the final product:

IMG_2087.JPG

IMG_2088.JPG


I hope that whoever buys these feels the heart we put into them and that they offer the wearer a little connection to our heavenly slice of earth (if I don’t keep them all for myself;)


Well, stay tuned for more from my kids entrepreneur series to see how we did at the craft fair and what else we might be making. I have a few more things I’m planning on doing with my son as part of the money-making process including budgeting, giving back and goal setting as well.

We also have a few more projects up our sleeves: cool things to sell that kids can make and people will actually want. Because that’s all part of the business process too, right? Creating products that people actually want. I’ll be sure to share what we come up with.


Did your parents ever help you start up a “side business” when you were a kid? Have you ever tried to help your own children with this?

Fall Glass Block Decoration

Fall Glass Block Decoration


As promised in my last post about affordable fall decorating, I bring you my DIY fall glass block decoration.

Now, I’ve seen these things popping up at craft fairs all over, but I never actually looked to see how these things were made.

Then, when I was shopping at Hobby Lobby for my fall decorations, I saw a block at the checkout counter and thought, hey I’ll just wing it. I had already bought a string of purple and black Halloween lights that were perfect for the inside. So, what the heck?


DIY Fall Glass Block Decoration

DIY Fall Glass Block Decoration

Supplies: All you need is a glass block, a string of lights, a spool of ribbon and your decorations of choice.

Step One: Thread the lights inside the hole at the bottom of the block. Stuff them inside all disorganized. If you stuff them in nicely, it won’t look as good. Fair warning.

Step Two: Follow this tutorial from Pinterest to create a pretty bow out of your ribbon. I found this adorable spool of ribbon at Dollar General. It was wired for structure and had the cutest little hipster arrow pattern on it in…copper! The color of the season.

Step Three: Attach or tie the ribbon around the glass block.

Step Four: add your decorations wherever it suits you. I found this pretty little fall flower clip for $1 at the Dollar General that I just clipped to the center of my bow.


glass block with autumn decorations


diy fall decorations


DIY fall glass block decoration

Just plug this baby in and…

Voila!

This simple glass block decoration could easily be changed up for a different season. Just change out the lights and add a different decoration to the top of it!


I’d love for you to pin this tutorial and if you use it to make your own, I’d love to see what you made!

DIY Polypro Tote Bag and a Giveaway!!!!

Today I’m going to share a little simple beginner’s sewing project and a handmade polypro tote giveaway!

I found this super duper cute tree material when I was shopping for something completely unrelated at Joann’s one day. Never happens…

I didn’t exactly know what I’d make with it, but I bought a yard of the fabric just cuz. It was just too cute. Then, of course, the logical thing to do with polypropylene is to make a tote bag out of it! We sell them by the hoards where I work, so I have some background in polypro, yo!

So, instead of losing myself in Pinterest to find a pattern, I winged it and made up my own. And now I’m sharing my mad tote-whip-up secrets with you, haha.

I made one small shortcut that you can totally remedy if you’d like–I didn’t use a separate piece of fabric for one of my gussets like a real pro would (I can’t even sew straight, so pfffff). If you don’t give any cares how a pro would do it, just skip it! And if you don’t like fly-by-the-seat-of-your-pants patterns, then this probably isn’t for you;)

By the way, jump to the bottom of this post for a chance to win this very tote, made by me!


Polypro Tote Giveaway and DIY Sewing Instructions

DIY Polypropylene Tote Bag

Materials

  • 1 yard polypro material
  • Matching thread
  • Regular sewing supplies like a scissors, pins, etc.

Directions

Figure out the size you want your tote bag to be. I knew I wanted mine to fit standard magazines and books, so I used a picture frame that was just bigger than a textbook as my measuring stick. I just used a pencil and traced the frame on the back of the material. Pencils work like a charm on polypro.

20151231_172103.jpg

I traced the frame for the front and traced it a second time for the back. Then I cut out a 3-1/2″ wide strip that was the length of one horizontal and one vertical side of the picture frame for the bottom and one side gusset.

Then I cut out one more 3-1/2″ wide strip for the other side gusset and two really long handles. I think I cut them to the length of the ream and 3″ wide. If you want to be precise, hang a tape measure over your shoulder to figure out how long you want the straps to hang.


DIY polypropylene tote pieces

From top: side gusset, side and bottom gusset, and front/back panels

Homemade polypro tote handles

 Long strips for the straps, two straps per bag.


First, make your handles. Fold the long sides together, pattern facing inside, pin together and press. Sew down the raw side with 1/4″ seam allowance.

how to make simple tote handles

Now, try to get these suckers right-side-out again. It’s a pain in the butt, but using “tools” helps (i.e. a pencil with eraser, tiny kid fingers).

Now get to work on the bag. Begin by sewing the side and bottom gusset panels onto the front bag panel, right sides facing each other.

homemade polypro tote side and bottom gusset

Pin the side gusset to the front bag panel, starting flush with the top.

Continue around, sewing on the bottom gusset, shown below.

sewing handmade polypro tote

DIY polypro tote sewing in progress

 Then sew the back panel to the other side of the gusset, right sides facing each other. And then the bottom gusset too.

 You’ll sew on the other side gusset similarly, attaching it to the front panel, back panel and bottom gusset with right sides facing in.

Next, attach the handles. This is probably the trickiest part, but it’s really not all that tricky.

First, line up the open edges of the handles with the top of the bag and pin. Do this on both sides.

simple polypro tote bag sewing project

Now turn down the top of the bag 1″ all the way around and pin. At this point, you can remove the first set of pins. Sew all the way around this top rim of the bag. You can double needle stitch if you’re so inclined.

sewing handles and top of tote bag

Now, fold the handle back upward and sew them onto the top of the bag, back and forth a few times.

reinforced polypro tote handles

polypro tote giveaway

I quadruple reinforced these suckers just for good measure.

Now press the bag for crisp seams and snip away any extra threads.

Voila!

Let me know in the comments if any questions come up for you as you’re making this.


The only thing the bag still needs is some kind of bottom support insert. But…it’s suitable for what I wanted, as is. It’s perfect for carrying library books, church supplies, a change of clothes for the gym, some TP and cereal from the store, or whatevs.


DIY polypro tote giveaway and sewing project


NOW FOR THE Polypro Tote GIVEAWAY!!!!

I made two of these bags and only want to keep one. So, the other one I’m raffling off to one lucky reader! You’ll get my very own invented tote bag with this adorable tree print made by my very own (albeit shaky) hands!

To enter, you must join my mailing list. There’s a box at the bottom of this post that offers 14 fat-shredding treadmill workouts. That’s where you can sign up.

Hey hey, you’ll even get a set of free workouts with your entry as a bonus, if you want them. Everyone’s a winner!

Once you’ve done so, leave a comment below. Your comment will be your entry for this giveaway. (edited to add: if you’re already a subscriber, just leave a comment and I’ll add you!)

If you would like one bonus entry, share this giveaway on Facebook, Twitter or Instagram and leave another comment with a link to your social post and your name will go in a second time.

Click to Tweet: Win an adorable handmade tote bag over at http://ctt.ec/9wnQa+ And find out how to make one of your own! #sewingproject #giveaway

The contest ends at midnight on August 24th and a winner will be announced on the 26th when I’m back from camping;)

Good Luck!


P.S. I’m sharing this over on Skip to My Lou, Made by You Mondays.

Woven Tennis Racket DIY

So, I’m a fitness junkie (duh) but I am not very excited about the workout “look” that is pretty much universal in the world right now, from clothing to equipment to logos.

The athletic look is basically a one-size-fits-all look. Lots of athletic stripes, lots of hardcore sweaty pics, lots of iron and heathered polyester and patterned leggings. The traditional athletic look is really not my style at all–well, except for the leggings.

In fact, in my search of interior design inspiration for my home gym on Pinterest, I came up pretty empty-handed. Everything looks like a regular jock-style gym (for lack of better terminology).

Let’s change that!

So, I’m trying to come up with some of my own decorations to fuse my love of fitness with my love of vintage and boho styles. Those things usually don’t go together. At least until I get my hands on them.

One decoration I came across on a different search were these embroidered tennis rackets I found on Pinterest. Love at first sight!!!!


Woven Tennis Racket DIY

So, I picked up these two old tennis rackets at a junk store for just $0.50 each! I chose two with the most vintage-y designs that I liked. And I like the juxtaposition of wood and metal. They really weren’t in playing shape anymore, so I didn’t feel bad retiring and re-purposing them.

vintage tennis rackets

Then, I just freestyled a weaving design with a “me” color scheme. I used yarn, but you could also use embroidery floss. You just weave under-over-under-over the strings. You can easily weave horizontally, vertically or diagonally.

Alternate light and dark yarn colors and alternate the thickness of each section to give it a variegated look. When you come to the end of a section, just tie the string off in the back.

woven tennis rackets for vintage home gym decor

Then, hubby helped me hang them, staggered, over my weight shelf.

repurposed tennis rackets

I love the sporty, vintage vibe these tennis rackets add to my workout space now. I can’t wait to add more elements like this!

If this post inspires you to make your own woven tennis rackets, I’d love to see them!

Would you like more ideas like these?


PS, I finally claimed this blog over on Bloglovin, and I’d love for you to add it to your regular feed. I need my workout space to fit my personality, so I have lots of styling projects to invent and potential blog material to go along with it.

Follow my blog with Bloglovin

DIY Zumba Belt

I love the idea of Zumba belts. I love the idea of wearing jingly Zumba belts for other dance programs too.


DIY Zumba Belt

I also have a stack of silk scarves that I’ve collected from thrift stores over the years. They’re usually something like 50 cents, so it’s hard to resist their ornate designs. Problem is, it’s hard to know what to do with them. I’ve seen neat curtains and skirts made out of them, but that’s about it.

Well, you marry your love of Zumba belts and your love of thrifted silk scarves, and you’ve got yourself an upcycled dancing belt!!!


Ingredients

  • Silk scarf
  • Elastic or cord
  • Thread and needle
  • Small jingle bells
  • Other embellishments

DIY Zumba Belt Supplies

Directions

Check to see if the scarf can be tied around your waist at the corners.

If not, you will need to sew on elastic or some type of cord that is long enough to tie around your waist.

Fold your scarf in half, corner to corner. Figure out where you want your cord.

Zumba belt instructions

Sew the cord to your scarf at 1″ intervals or so, using just a basic stitch to hold it in place.

Zumba Belt Waist Tie

Lay your jingle bells and other embellishments out on your scarf and once you’ve found an arrangement you like, sew the bells in place. Feel free to make it as embellished or simple as you’d like. It’s important to personalize it to your own taste.

DIY Zumba belt embellishments

Try it on to make sure it fits!

20160425_180650.jpg


DIY Zumba belt finished

That’s it! Your very own, one-of-a-kind, ornate Zumba belt.

If you make one, I’d love to see it! Comment with a link!

Agility Ladder DIY

You can get all the supplies to make your own agility ladder at a regular hardware store, and it really only takes less than half an hour to make.

 photo 011ac215-35d0-4db1-b0ee-06d9ffe3613a_zpsef1dcba7.jpg

Agility ladders are an amazing unsung fitness tool that you’re probably not using. I will be back to share some agility training drills soon too, so stay tuned for that. But these exercises shouldn’t be saved for professional football players or high school track teams. Agility drills not only increase your agility, but they also provide a great source of cardio, especially if you’re getting bored with your treadmill routine. You can get pretty creative with your fancy footwork, like sport dancing, and it also tests your mental acuity. We did some agility drills at the NASM workshop I attended and they were kind of fun and challenging and had me out of breath within a few minutes.

 photo P9162039_zpscfa561cf.jpg

Supplies:

  • Short nails/carpet tacks
  • Hammer
  • Wood shims or other flat thin wood*
  • Rope
  • Tape measure

Instructions:

1. Stack two shims on top of each other with one narrow side and one thick side of each together. Nail the end of the rope into the top of the first shim stack.

 photo P9162040_zps25ff1b62.jpg

 photo P9162041_zpsdd87535f.jpg

2. Measure 15 inches to the next rung and hammer another nail into the top of that shim stack.

3. Continue until you have 15 rungs. Cut the rope at the end of the 15th rung. Now, go back and do the same thing on the other side of the ladder, hammering the string to the shims every 15 inches.

 photo PA262102_zps62fac132.jpg
 photo PA262099_zps34dd1886.jpg

Voila, your very own agility ladder! It’s easy to fold up and hang in your garage or shed. Be careful if you’re doing this project outside with little kidlets around. All the neighbor kids ran over when they saw what I was doing and asked if they could “help.” Um, no. And we ended up with a knocked over pile of nails in the grass that I was really trying to prevent (barefoot in the summer, ouch!). Just hand them a few shims and a little length of rope and see who can make the best godseye.

*I would actually recommend using some thin wood versus shims. Shims are what I had on-hand, but nailing into the narrow ends proved to be a bit tricky. The wood needs to be pretty thin though, so you’re not tripping over it. Also, if you have feet that are much larger than mine (women’s 8), the width of a shim might not work for you. You should be able to fit both feet inside with some room left over, so take your own measurements from there.

Easy Budget Picture Collage Wall

I am not very good at following strict rules when it comes to home improvement-ish projects. There was no level or tape measure used in the making of this project.

I’ve had one sad little picture hanging on my dining room wall for, like, years that needed some friends. I started to put together a few framed pretties after framing Hubster’s anniversary card and ultimately decided to make a collage wall.

Photo

To begin, gather some of your favorite photos, art prints, and original artwork with repeating themes and colors. The frames should either be all light-colored or all dark-colored or somewhere in between. If your pictures include matting, the same rule applies–go with a monochromatic color scheme. There has to be some semblance of similarity or your wall will end up looking like a hodge podge–unless you’re going for that look:)

My framed pictures include one wooden anniversary card, one wooden owl card from Mackinac Island, my official NASM certificate, one thrifted 3D picuture, one free print from here, one painted leaf and one watercolor gift from a friend. I love how each piece has a history and story behind it from family trips to personal accomplishments to wedding gifts. Each one is totally my style too with a vintage/nature theme with lots of greens. The final product matches my record player set-up perfectly with its vintage-y vibe.

Wall prints
3D vintage print
The cutest vintage 3D picture ever!

Next, I took all my framed pieces and laid them out on the floor in front of the chosen wall. It took awhile to find just the right arrangement for the wall. The trick is to find a good balance. You want to balance the bigger with the smaller. I also had to balance the white and off-white art backgrounds. Keep all frames pretty close together with about 1-2 inch gaps in between. Add and take away frames until you find the sweet spot.

Wall Collage

Now, most professional collage-ers (whoever they are) will tell you to draw out the pattern on paper and get out the level to find the most precise angles. Well, I made this wall without doing any of those things. You may want to at least take a picture of your set-up to refer back to before you get started. I just eyeballed it. I memorized right about where one picture overlapped another and got to work. I’m not the type of girl who likes to fuss over things.

Finished Collage

Then, I just hammered away until they were all secure (which is really hard for me to do because I don’t like tainting perfectly smooth walls, even if they’re my own). You’ll want to be careful with the nails too, avoiding any electrical wires and ideally pounding the nails into studs. It’s nice when your whole family takes a hunting trip and leaves you with your whole house as your open canvas. Oh the possibilities!

vintage collage wall

Now, I really love walking past this wall. It really makes me smile. Oh yeah, and the best part? I only paid about $6 for this entire project. I paid 50 cents for the vintage picture and around $3 for each of the wooden cards. The rest of the items were gifted or free!

Other good gallery collage wall resources for those who like a little more structure:

How to Hang Art Groupings
Tips for Installing a Gallery Wall
Wall Art Guide
How to Create a Gallery Wall on a Budget
Eight Ways to Display Artwork on a Budget

DIY Jewelry Organization Makeover

My jewelry collection was an eyesore. Let’s just put it at that (you’ll see). I would forget about pieces buried in the bottom drawer of my jewelry shelf, all those necklaces had a tendency to get clumped together, and it just gave me a headache to look at it. Finally, in an attempt to make little spaces like this of my home environment more cozy and put-together, I decided to tackle the jewelry organization project head-on. With a little perusing on Pinterest, I put together some rough ideas of what I wanted the finished project to look like and headed to the thrift store.
I went through about three phases of putting this project together over the course of about a week, so I’m going to share those with you in case it provides some inspiration for you too:
Phase I
Thrifting a jewelry holder and giving it a makeover
Thrifted wooden spoon holder
What began its life as a collector spoon holder (I think??) is now the bearer of all my jewelry.
I went to the thrift store with the sole purpose of finding some old forgotten knick-knack shelf to repurpose, since they’re usually quite easy to come by. After perusing the correct aisle, I didn’t come across any that I was satisfied with. The selection was pretty picked over at the time I got there, so I went on my next mission in the store, to find some 16×20 frames. By chance, I returned to that original aisle again to return something I decided against buying and did one more quick sweep. This ugly gem was hidden under some other nondescript wooden things. It’s really made out of some quite durable wood and had that nice drawer on the bottom for earrings and such. Score!

After work the next day, I took a trip to the hardware store and stood a full 5 minutes in the paint aisle trying to decide what color I wanted this bad boy to be. I had green in my hand, but I was still debating. Our bedroom is green, but what if it didn’t quite match? I finally thought, why not make the jewelry shelf match some of the jewelry itself with a fresh coat of silver? While I was at the hardware store, I also picked out two drawer knobs and some ring screws to add to the shelf for extra storage.

Silver jewelry organizer
The finished product. A HUGE improvement!

Hubster helped me find the right screw length for the side knobs, but I did all the work! These knobs and extra screws on the bottom provide extra storage for longer necklaces and such.
Phase II
Cleaning the jewelry
While I was going through my jewelry, deciding what to keep and what to donate, I came across a few pieces I still really like but that have become quite tarnished with age. With a little research online, I decided to try lining a glass casserole dish with tin foil, sprinkling baking soda over the jewelry, and pouring water over the top. This worked for some of the jewelry, but I had to go back and rub toothpaste on a few items to really get them to shine again. No expensive jewelry cleaner required!
Baking soda and tin foil for tarnished jewelry

Phase III
Jewelry organization

In order to tame the chaos that my jewelry had become, I wanted the finished project to be as orderly and visually appealing as possible. The first thing I did was gather some silver cardstock from my scrapbooking collection. I made these nice earring cards by simply poking holes in the folded cardstock with a thick tapestry needle that I had, but I’m sure a safety pin would’ve done the trick. I absolutely adore how my earrings are all organized and easy to grab now. I can get a good look at them all with one quick glance. And none of them are buried in a mess, only to never be used again. In fact, today I’m wearing a pair of earrings I had forgotten I even had!
Next, I strung all my necklaces on the spoon holder thingies, which turned out to be great necklace holders. Hubster happened to have a nail that perfectly matched the silver shelf, so I used that to affix the organizer to the wall behind our dresser. Now all my necklaces are completely visible, making getting dressed in the morning quick and easy.


Before

It pains me a bit to even show this (bad lighting notwithstanding) “before” picture. It’s really unnerving to keep my jewelry in such a disarray. And you can’t even see the dust bunnies collected there. *Shiver*

After

Not only does my jewelry look much better, but now my collection of glass perfume bottles is also on display again. Those pretties were kind of shoved behind my jewelry shelf and piled on with…random things. Now they’re all out for show again, just as I like them.

I’ve been collecting these pretties since High School
Ah much better

I forgot I even had this little ring holder in all my mess of things. It came in handy since I didn’t really have any other viable, convenient place to store my rings. The ring holder came with a matching vintage mirror and brush/comb set that I have on the dresser too. The vintage “dressing table” theme suits me perfectly!

Jewelry Storage Idea
That’s a wrap! I feel much more comfortable in my room now that I don’t have to look away from my dresser. Tackling these small spaces in my home, one at a time, has done wonders on my comfort level. I am so completely satisfied with these results and pretty satisfied that I tackled this project all myself.

How do you organize your jewelry at home? I’d love to see pictures or hear about your solutions too.