Home » crafting

Category: crafting

Kids’ Entrepreneur Series: Nature Necklaces

Nature necklace glass vials


My little buddy has the entrepreneur bug in him.

He’s always talking about what he can do or sell to earn money so he can accomplish his goals (i.e. buy toys, hehe).

And as my role as his momma and guide, I want to nurture the little business man in him.

So, we’ve been slowly working on projects so that he can earn some extra money.

Since we have a craft fair coming up at my workplace, we hustled our little buns off to get some inventory built up. A lot of people get their Christmas shopping done here. It’s perfect timing to get our little hustle on and get to selling!

So, what are we going to be selling at the craft fair?
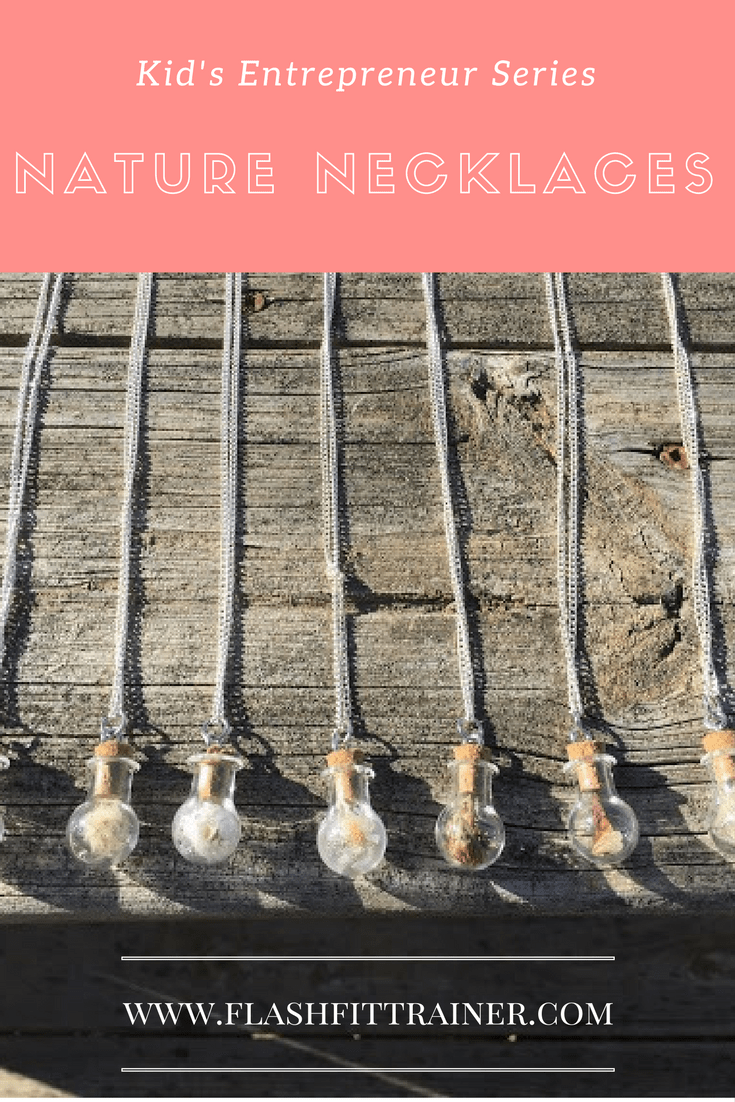
Nature necklaces!

Now, we’ve done two batches of these necklaces. The first was with real monarch wings that we’ve been collecting over the course of the summer. I will come back in a few days to show you how we made them. The hardest part is finding the wings!

IMG_1928.JPG


The second is little glass vials and bulbs that we filled with little bits and pieces of nature. We took a walk around the yard and collected little tiny seeds and flowers and things that would fit inside these itsy bitsy little vials. We also had a set of bigger glass vials that we filled with treasures.

Btw, You can watch our Periscope about these necklaces here. (Subscribe to see this series unfold before your eyes).

IMG_2077.JPG

These fun mini vial kits are available at Hobby Lobby:

IMG_2076.JPG

All the pretty fall things to stick inside:

IMG_2080.JPG

Other ideas for what you could put inside the vials:

  • Calming or invigorating aromatherapy blends
  • Tiny scrolls with messages, poems or scripture
  • Sand/soil from places you’ve traveled: I brought back volcanic ash from Costa Rica in two of mine.
  • Charms with special meaning
  • A lock of hair from your child’s first haircut
  • Lace from your grandmother’s wedding dress
  • Bark from a tree at your childhood home


So, all we did was place the pretty nature bits inside and plug them with the included cork. Then we used jump rings to attach the eye hooks to the necklaces.

IMG_2082.JPG

IMG_2083.JPG

IMG_2085.JPG

Annnnnnd, the final product:

IMG_2087.JPG

IMG_2088.JPG


I hope that whoever buys these feels the heart we put into them and that they offer the wearer a little connection to our heavenly slice of earth (if I don’t keep them all for myself;)


Well, stay tuned for more from my kids entrepreneur series to see how we did at the craft fair and what else we might be making. I have a few more things I’m planning on doing with my son as part of the money-making process including budgeting, giving back and goal setting as well.

We also have a few more projects up our sleeves: cool things to sell that kids can make and people will actually want. Because that’s all part of the business process too, right? Creating products that people actually want. I’ll be sure to share what we come up with.


Did your parents ever help you start up a “side business” when you were a kid? Have you ever tried to help your own children with this?

Fall Glass Block Decoration

Fall Glass Block Decoration


As promised in my last post about affordable fall decorating, I bring you my DIY fall glass block decoration.

Now, I’ve seen these things popping up at craft fairs all over, but I never actually looked to see how these things were made.

Then, when I was shopping at Hobby Lobby for my fall decorations, I saw a block at the checkout counter and thought, hey I’ll just wing it. I had already bought a string of purple and black Halloween lights that were perfect for the inside. So, what the heck?


DIY Fall Glass Block Decoration

DIY Fall Glass Block Decoration

Supplies: All you need is a glass block, a string of lights, a spool of ribbon and your decorations of choice.

Step One: Thread the lights inside the hole at the bottom of the block. Stuff them inside all disorganized. If you stuff them in nicely, it won’t look as good. Fair warning.

Step Two: Follow this tutorial from Pinterest to create a pretty bow out of your ribbon. I found this adorable spool of ribbon at Dollar General. It was wired for structure and had the cutest little hipster arrow pattern on it in…copper! The color of the season.

Step Three: Attach or tie the ribbon around the glass block.

Step Four: add your decorations wherever it suits you. I found this pretty little fall flower clip for $1 at the Dollar General that I just clipped to the center of my bow.


glass block with autumn decorations


diy fall decorations


DIY fall glass block decoration

Just plug this baby in and…

Voila!

This simple glass block decoration could easily be changed up for a different season. Just change out the lights and add a different decoration to the top of it!


I’d love for you to pin this tutorial and if you use it to make your own, I’d love to see what you made!

DIY Polypro Tote Bag and a Giveaway!!!!

Today I’m going to share a little simple beginner’s sewing project and a handmade polypro tote giveaway!

I found this super duper cute tree material when I was shopping for something completely unrelated at Joann’s one day. Never happens…

I didn’t exactly know what I’d make with it, but I bought a yard of the fabric just cuz. It was just too cute. Then, of course, the logical thing to do with polypropylene is to make a tote bag out of it! We sell them by the hoards where I work, so I have some background in polypro, yo!

So, instead of losing myself in Pinterest to find a pattern, I winged it and made up my own. And now I’m sharing my mad tote-whip-up secrets with you, haha.

I made one small shortcut that you can totally remedy if you’d like–I didn’t use a separate piece of fabric for one of my gussets like a real pro would (I can’t even sew straight, so pfffff). If you don’t give any cares how a pro would do it, just skip it! And if you don’t like fly-by-the-seat-of-your-pants patterns, then this probably isn’t for you;)

By the way, jump to the bottom of this post for a chance to win this very tote, made by me!


Polypro Tote Giveaway and DIY Sewing Instructions

DIY Polypropylene Tote Bag

Materials

  • 1 yard polypro material
  • Matching thread
  • Regular sewing supplies like a scissors, pins, etc.

Directions

Figure out the size you want your tote bag to be. I knew I wanted mine to fit standard magazines and books, so I used a picture frame that was just bigger than a textbook as my measuring stick. I just used a pencil and traced the frame on the back of the material. Pencils work like a charm on polypro.

20151231_172103.jpg

I traced the frame for the front and traced it a second time for the back. Then I cut out a 3-1/2″ wide strip that was the length of one horizontal and one vertical side of the picture frame for the bottom and one side gusset.

Then I cut out one more 3-1/2″ wide strip for the other side gusset and two really long handles. I think I cut them to the length of the ream and 3″ wide. If you want to be precise, hang a tape measure over your shoulder to figure out how long you want the straps to hang.


DIY polypropylene tote pieces

From top: side gusset, side and bottom gusset, and front/back panels

Homemade polypro tote handles

 Long strips for the straps, two straps per bag.


First, make your handles. Fold the long sides together, pattern facing inside, pin together and press. Sew down the raw side with 1/4″ seam allowance.

how to make simple tote handles

Now, try to get these suckers right-side-out again. It’s a pain in the butt, but using “tools” helps (i.e. a pencil with eraser, tiny kid fingers).

Now get to work on the bag. Begin by sewing the side and bottom gusset panels onto the front bag panel, right sides facing each other.

homemade polypro tote side and bottom gusset

Pin the side gusset to the front bag panel, starting flush with the top.

Continue around, sewing on the bottom gusset, shown below.

sewing handmade polypro tote

DIY polypro tote sewing in progress

 Then sew the back panel to the other side of the gusset, right sides facing each other. And then the bottom gusset too.

 You’ll sew on the other side gusset similarly, attaching it to the front panel, back panel and bottom gusset with right sides facing in.

Next, attach the handles. This is probably the trickiest part, but it’s really not all that tricky.

First, line up the open edges of the handles with the top of the bag and pin. Do this on both sides.

simple polypro tote bag sewing project

Now turn down the top of the bag 1″ all the way around and pin. At this point, you can remove the first set of pins. Sew all the way around this top rim of the bag. You can double needle stitch if you’re so inclined.

sewing handles and top of tote bag

Now, fold the handle back upward and sew them onto the top of the bag, back and forth a few times.

reinforced polypro tote handles

polypro tote giveaway

I quadruple reinforced these suckers just for good measure.

Now press the bag for crisp seams and snip away any extra threads.

Voila!

Let me know in the comments if any questions come up for you as you’re making this.


The only thing the bag still needs is some kind of bottom support insert. But…it’s suitable for what I wanted, as is. It’s perfect for carrying library books, church supplies, a change of clothes for the gym, some TP and cereal from the store, or whatevs.


DIY polypro tote giveaway and sewing project


NOW FOR THE Polypro Tote GIVEAWAY!!!!

I made two of these bags and only want to keep one. So, the other one I’m raffling off to one lucky reader! You’ll get my very own invented tote bag with this adorable tree print made by my very own (albeit shaky) hands!

To enter, you must join my mailing list. There’s a box at the bottom of this post that offers 14 fat-shredding treadmill workouts. That’s where you can sign up.

Hey hey, you’ll even get a set of free workouts with your entry as a bonus, if you want them. Everyone’s a winner!

Once you’ve done so, leave a comment below. Your comment will be your entry for this giveaway. (edited to add: if you’re already a subscriber, just leave a comment and I’ll add you!)

If you would like one bonus entry, share this giveaway on Facebook, Twitter or Instagram and leave another comment with a link to your social post and your name will go in a second time.

Click to Tweet: Win an adorable handmade tote bag over at http://ctt.ec/9wnQa+ And find out how to make one of your own! #sewingproject #giveaway

The contest ends at midnight on August 24th and a winner will be announced on the 26th when I’m back from camping;)

Good Luck!


P.S. I’m sharing this over on Skip to My Lou, Made by You Mondays.

My Second Ever Quilt

I never thought I wanted to tackle a quilt. However, after my first experience, I started gathering supplies for two more quilts before I was even finished binding up the first one.

This second ever quilt of mine is made with a vintage flower theme, mostly pinks and greens. I chose a fleece blanket for the lining instead of batting due to cost. I actually paid less for an actual fleece blanket than for as much batting as I would’ve needed, and I figured it would be really warm. See, Hubster doesn’t mind the pinks as long as the blanket is warm. Win-win, people!

The backside is a queen-sized bed sheet I found at the thrift store.

The quilted side is made with squares of fabric mostly from the clearance section at JoAnn’s and Walmart, cuz that’s how I roll.

Quilt top/fleece blanket/bed sheet
My grandma, the very person who taught me to sew, was very tickled when she saw my project one night when she came over for dinner. I just told her to not look so closely at the seams. I’m a total mess when it comes to sewing perfectly straight and all professional-like.
Peanut’s quilt is up next. His will be much more masculine, with fabric from several men’s 3XL flannel shirts and remnants I found at the thrift store. The back will be a cuddly soft deer-themed fleece blanket that he just fell in love with. It’s maybe a little too country for my taste, but it’s not my tastes that matter when it comes to him.

While I was all motivated and stuff to sew, I also whipped up some other projects that I’ve been thinking about for awhile. You see, Peanut has two Build A Bear animals that needed some more wardrobe items to choose from, particularly pajamas. So, I found a few tutorials online and took Peanut to the fabric store to pick out his own fabric. He liked the sailor anchor theme for the pajamas and the checkered racing fleece for the sleeping bags.

Tiger and Mr. Fluffy

There’s even a cutout for the tails! Be careful with the
tutorial though. The way you’ll be sewing the shorts isn’t 
quite what one might expect.

Roll-up sleeping bags, aren’t these the cutest?

Sometimes I just really get on a roll with my sewing. I mentioned before that my Environment, particularly my home, is one of my biggest priorities in life (after God, family, that sort of thing). Home is the most important place on earth. I strive to do things that improve upon the comfort, serenity and security we feel at home. I tell ya, that quilt of mine is sure doing a number on my love for our bedroom. I just smile every day when I see it. Next up, I’ve been working on framing some pictures for behind our bed and DIY-ing a new jewelry shelf. You’ll see…

What projects have you been working lately?

DIY Workout Stick

Ever since I saw my first broomstick workout in a magazine, I’ve been smitten. I love how using something as simple as a stick can really change the angles and depth of a workout. It can give you a better stretch, offer you a bit more stability during challenging balance moves, and allow you to move deeper into certain moves.

Today, let’s make a simple fun workout stick, shall we? You can use a regular broomstick–or even a straight stick you find outside–to do the workouts. But wouldn’t it be much more fun to create an artistic workout stick that you can use whenever the mood strikes? I thought so…

Just a quick announcement: now that I’m qualified to be giving some exercise advice, I have put together three separate workouts that you can do with your new workout stick. I’ll be releasing one per week for the next three weeks! So stay tuned for that, and feel free to share on Pinterest!

Workout Broomstick Tutorial

Materials

  • 3/4″ (or thicker) wooden dowel from the hardware or craft store
  • Washi tape
  • Decorative duct tape
  • Acrylic paints (or other wood paint) and paintbrush
  • Any other decorative items you’d like to deck your stick out in


Dowel


Washi tape and acrylic paint

Directions:

  1. If you’d like to change the color of your dowel, use acrylic paint (or any other appropriate paint for wood) and give your dowel a few coats. Let dry. Paint stripes or designs with other paint colors if you’d like and allow to dry completely before moving on.
  2. Now, use your washi or duct tape to create fun patterns and stripes across your stick. I went with a simple light blue and green theme, punctuated by some polka dot decorative tape on the ends.
  3. Feel free to get creative with your stick design. Maybe you’d like to add some rubber elements for a good grip or add tassels to the ends of the stick. Your imagination is the limit!

Voila! Your very own workout stick for any broomstick workouts you might find online or here on my blog. I kept mine pretty simple, but feel free to get creative with your art supplies. It almost feels as though you get to play with a grown-up version of a baton. Check back here next week for my first of three broomstick workouts!

Project Details:

  • Washi tape from here and Target
  • Wooden dowel from Lowe’s
  • Acrylic paints from my own stash (maybe originally from Ben Franklin?)

What’s Happening

As I told you, I was in Chicago this weekend for an NASM live personal training workshop, so it was a little quiet around here as our internet connection was touch-and-go and we were enjoying our mini vacation. I will be back tomorrow with Part 1 of the trip and give you a lowdown on all of that. Then, Part 2 will come later in the week. I have so much to share!

For now, I just want to say how excited I am to have been featured on Totally Tutorials. With the number of submissions TT receives and the rules you must abide by, I’m honored that my yoga mat holder tutorial made the cut. It totally made my weekend!

Happy Monday!

Birthday Banner DIY #2: Lace Doily Banner

The second installation in my birthday banner series is the Lace Doily Garland.

Thrift stores are littered with doilies, and they are often quite reasonably-priced. I always wondered what I could do to rescue those pretty little lace things. I would never put them under lamps or use them as coasters like in times past, but I thought they must still be good for something this day and age. Enter, the birthday garland.

I happened to find a stack of lace doilies that were all exactly the same. This works perfectly for a banner, but I think it would look neat with mis-matched ones too.

Photobucket

All I did was measure a piece of white thread the entire length of the banner. Simply place the doilies side-by-side to figure out how long you need the thread.

I then started at one side and folded each doily in half. Once halved, I sewed big stitches across the top. These don’t have to be perfect by any means, they should just do the job.

Photobucket
Continue on down the line until all doilies have been attached to the thread.
Photobucket

Leave extra thread on both sides to make loops for securing the banner later. I knotted mine in a loop.

Photobucket

Photobucket

Then, hang as desired. I made an actual “happy birthday” banner to go over the top using alphabet stencils and scrapbook paper, similar to my last one. I think something like this would also be pretty to use for DIY wedding decor too. Enjoy! Oh, and Save the Doilies!

Photobucket

Birthday Banner DIY #1: Fringe Benefits

At work, in my department, we skipped a year or two of celebrating birthdays. That made me sad. So, I took it upon myself to resurrect the whole birthday scene. I promised to make one tasteful, personalized banner for each birthday person. Nearly everything that I’ve made so far has been from supplies I already had on-hand (scrapbook paper, tissue paper, tree branches, etc), so it didn’t break my budget. I just think that birthdays are worth celebrating with something lovely.

Since I’ve been working my way through different designs for this past year, I thought it would be fun to share a few of them to perhaps inspire you for your next celebration.

I’ll begin with one of the simplest banners, cut from tissue paper.

Fringe Benefits Banner

1. Fold about 3-4 sheets of tissue paper in half. Then, fold in half again.

Photobucket
Photobucket

2. Cut along the folds on the side with open ends.

Photobucket

3. Using the side with the open ends, cut slits about halfway up every 1/2-inch to inch or so. They don’t need to be equal. This will give the banner a fringe-ish look.

Photobucket

4. Now, open the banner at the center and attach a length of string right down the middle with tape.

Photobucket

5. Flip back over and you’re finished. Use the ends of the string to attach your banner any way you wish. Use some coordinating scrapbook paper cut into 3″ x 3″ squares and some alphabet stickers to create the “Happy Birthday.” Staple the squares to a coordinating length of ribbon.

Photobucket

tissue paper banner

I used this same technique for the Concessions banner, except I cut a zig-zags along the end of the tissue paper before I cut the fringe. Feel free to play around with this design. These banners would be especially festive for a Hawaiian-themed party.

Photobucket

There’s more where that came from. I have some map banners, tassels and driftwood designs up my sleeve. Stay tuned!

*Hey, did anyone notice we got a new fence in the middle of this project? Hee hee!

One Skein of Ribbon Three Ways

I love it when I visit the thrift store and snag pretty vintage ribbons. They don’t show up very frequently, but when they do… I swipe ’em.

Ribbon Skeins2, Thrift Store Ribbons

Not only are they pretty to look at, but they’re also great for sooooo many projects. I have used them as notebook binding with a little Modge Podge. I have glued them onto art journal and scrapbook pages. And I have also used them for the projects shown below. Let’s take this $0.25 skein and see how far it can go, shall we?

Vintage ribbon, Thrift store ribbons

1. The first thing I made with this, my favorite skein from the stack above, is a hair accessory holder. Most of my pretty hair pins were stuck in a makeup bag that didn’t see the light of day. I even routinely forgot and neglected what was in there! This was just a quick solution that I whipped up. It hangs from an adorable vintage towel holder in our bathroom closet.

Photobucket

All I did was take a length of the ribbon and fold it in half. Then, I hand-sewed two loops to both ribbon ends. I hang it folded in half so that I can loop my headbands through too (notice the burnt edge flower hairband). The ribbon is stiff enough that I can just slide my hairpins right on. I made the blue hairband and the top bow-tie clip. The second and bottom bow-tie clips were from Dainty Daisies. The big flower clip was from a now-defunct local store.

2. Ribbon headband: Remember how I told you that you could find hairband packs at dollar stores? This gray one came from one such pack. The bow is made by taking a small length of ribbon and either gluing or sewing the ends together to create a circle. Then, pinch the centers together and wrap with a coordinated ribbon. Sew the bow to the hairband and voila!

Ribbon hairband, Hairband made from vintage ribbon

3. Shower Ring Statement Necklace: I found this idea on Promise Tangeman’s blog. I connected three shower rings, wrapped ribbon around them, and strung them through a silver chain. Hot glue works just fine for holding the ribbon in place.

Photobucket

Fun, huh? And there is plenty…I mean plenty…of ribbon leftover. Let’s see where else this can take me.